Organize your fridge by zones: ready-to-eat food on top, dairy and stable perishables in the middle, raw meat sealed on the bottom. Add clear bins, a lazy Susan for small jars, and a simple date-labeling habit, and you’ll cut waste fast. Keep the whole unit cold enough, ideally below the temperature where bacteria grow quickly, and start with one high-impact move this week: a labeled “Eat Me First” bin at eye level.
TL;DR:
- Organize your fridge by zones, placing ready-to-eat foods on top, dairy in the middle, and raw meat on the bottom to prevent cross-contamination.
- Use clear, labeled bins and a visible “Eat Me First” bin at eye level to improve food visibility and reduce waste.
- Keep the fridge at 40 °F or below, verify with a thermometer, and clean shelves weekly to maintain food safety and freshness.
- Store high-humidity produce in dedicated drawers and separate ethylene-producing fruits from greens to extend produce shelf life.
- Avoid storing milk and eggs in the door, and always seal raw meats properly to prevent leaks and spoilage.
Table of Contents
- Fridge Organization Ideas by Shelf Zone
- Fridge Storage Containers and Organizer Tools That Earn Their Space
- Crisper Drawer Setup: Humidity and Ethylene Management
- Leftover Rotation: The “Eat Me First” System
- Fridge Temperature Rules and Cleaning Habits
- Small Fridge Organization Tricks for Tight Kitchens
- Choosing Fridge Organizers: Glass vs. Plastic and What Else Matters
- Why Simple Beats Fancy: A Publisher’s Take
- Build Your Fridge Organization Kit the Simple Way
- Sources
- FAQ
Fridge Organization Ideas by Shelf Zone
Every shelf in your fridge has a different job, and the temperature gradient inside the box is the reason. Warm air rises, cold air sinks, and the door swings open dozens of times a day, so each zone calls for different food.
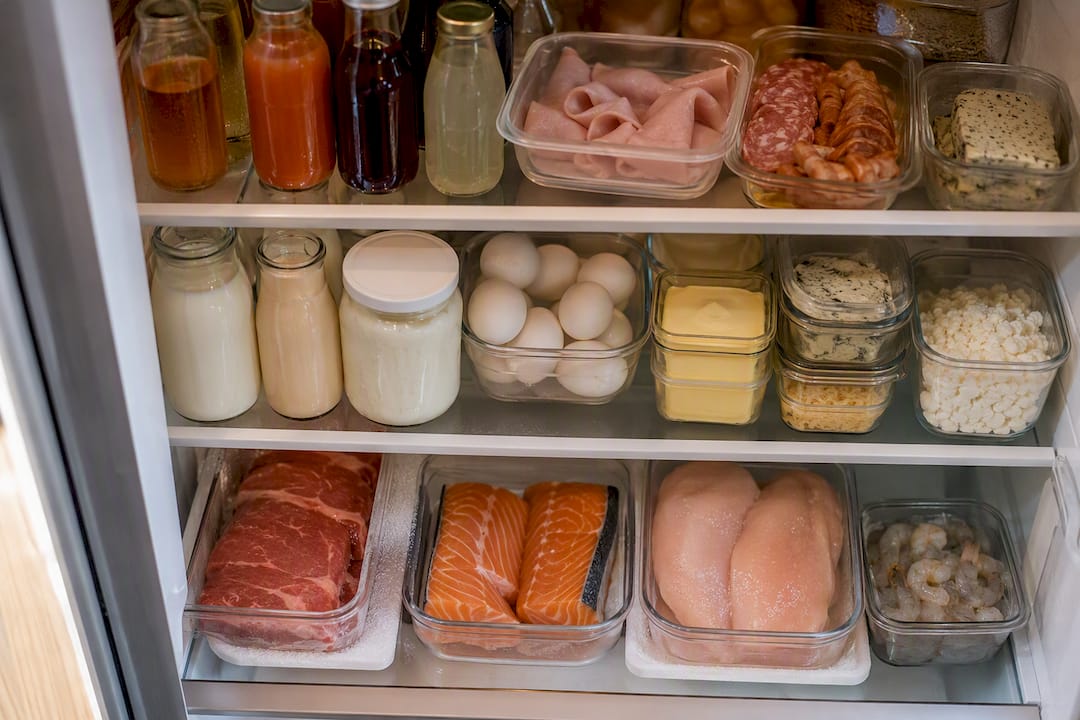
The top shelf runs slightly warmer and is easiest to reach, which makes it the right spot for ready-to-eat items: leftovers, deli meats you’ll eat within a few days, and drinks you grab often. Nothing here drips onto food below it, and that matters more than it sounds. The middle shelves hold steadier, moderate temperatures, so dairy, eggs (if your fridge has an egg shelf rather than door slots), and yogurt do well there.
The bottom shelf is the coldest part of the main compartment, and it should be reserved for raw meat, poultry, and seafood. Organizing shelves by required cooking temperature means the food most likely to carry bacteria sits where a leak can’t contaminate anything underneath it. Always use a sealed container or a rimmed tray, never a loose wrapper.
The door is the warmest zone in the entire fridge because it absorbs heat every time it opens. According to USDA guidance on refrigeration, that makes it fine for condiments and bottled drinks but a poor choice for milk or eggs, even though most fridges ship with an egg rack built into the door.
Crisper drawers round out the layout:
- High-humidity drawer: leafy greens, broccoli, herbs, and other vegetables that wilt fast.
- Low-humidity drawer: most fruit, which releases ethylene gas as it ripens.
- Keep apples and pears away from anything delicate. Their ethylene output speeds up spoilage in nearby produce.
- If your crispers don’t have a humidity slider, a folded paper towel in the bin does a rough version of the same job.
Fridge Storage Containers and Organizer Tools That Earn Their Space
Clear bins beat opaque ones for one simple reason: you can see what’s inside without pulling everything out. Pro kitchens have organized this way for years, and The Kitchn’s chef-sourced tips back up what most home cooks eventually figure out on their own: visibility drives use, and food you can see gets eaten before it spoils.
A few tools do most of the heavy lifting:
- Clear bins with handles group like items (sauces, snack packs, cheese) so you can slide out an entire category at once instead of digging.
- A lazy Susan on a middle or bottom shelf keeps small jars and dressing bottles from vanishing into the back corner where they’re forgotten until they expire.
- Rimmed sheet pans or trays work as sliding shelf dividers, a trick borrowed straight from restaurant kitchen setups, and they double as leak catchers under anything that might drip.
- Measure your fridge’s interior depth and shelf height before buying anything. A bin that’s an inch too tall won’t close the door.
Pro Tip: Buy bins in one or two sizes only. A shelf full of mismatched containers wastes more space than no bins at all, because you can’t stack or nest them.
For labels, masking tape and a marker work fine. Write the contents and the date you opened or made it. That’s the whole system.
Crisper Drawer Setup: Humidity and Ethylene Management
Most produce spoilage comes down to two things: too much or too little moisture, and gasses from other produce speeding up decay. Fix both and your fruits and vegetables last noticeably longer.
Set one drawer to high humidity for vegetables like lettuce, spinach, and broccoli, which need moisture to stay crisp. Set the other to low humidity for fruit, which lasts longer when excess moisture escapes. If your fridge only has one crisper drawer, or none at all, you can fake the effect: line a bin with paper towels for high humidity, or leave a bin’s vents open for low humidity.
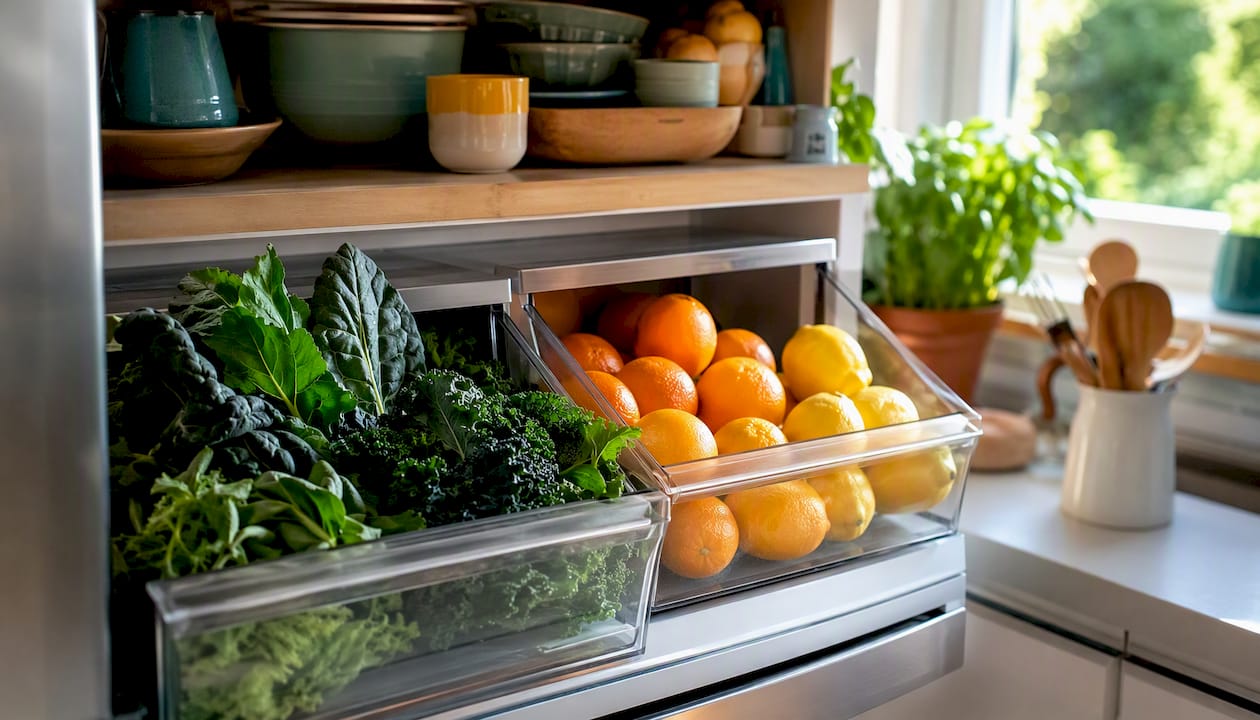
Keep ethylene producers, mainly apples, pears, and bananas, away from ethylene-sensitive items like leafy greens and berries. A drawer of mixed fruit and vegetables spoils faster than one that’s separated. A guide to fresh fruit storage points out that most fruit actually holds up best if you wait to wash it right before eating. Hardy greens are the exception: wash and dry them thoroughly before storing, and they’ll last most of the week.
Leftover Rotation: The “Eat Me First” System
Food doesn’t get wasted because people don’t care. It gets wasted because it disappears behind something else and gets forgotten until it’s gone bad. Fix that with three habits:
- Set up an “Eat Me First” bin at eye level, front and center, for anything close to its expiration date or leftovers from the last day or two.
- Label containers with the date and a short name (something like “3/14 chili” beats “leftovers”). Painter’s tape peels off clean and works better than most sticky labels.
- Rotate stock FIFO style. Push older items to the front and newer ones to the back every time you restock, the same system grocery stores use on their shelves.
A visible “first in” system genuinely changes behavior. When leftovers are staring at you every time you open the door, you eat them before they turn into a science experiment.
Give the whole fridge a 30-second scan once a week. It’s the fastest way to catch spoilage before it spreads.
Fridge Temperature Rules and Cleaning Habits
Everything above only works if the fridge itself is cold enough and clean enough to keep food safe. The USDA/FSIS recommends keeping your refrigerator at 40 °F or below, and if your unit doesn’t have a reliable built-in display, a $5 appliance thermometer solves that.
40 °F is the line between “safe” and “risky.” Bacteria that cause foodborne illness multiply fastest between 40 °F and 140 °F, which is why that single number anchors nearly every fridge-safety guideline.
- Wipe shelves with hot, soapy water weekly and clean up spills immediately, especially anything from raw meat.
- Contain raw meat in a sealed tray or bin so a leak never reaches another shelf.
- Cold zones vary by model. Some fridges run coldest near the vents rather than the back, so FSIS notes that a thermometer is the only real way to map your specific unit.
- After a power outage, check the temperature before assuming food is safe. Perishables held above 40 °F for more than two hours should generally be tossed.
A refrigerator thermometer guide walks through placement if you want to get this right the first time.
Small Fridge Organization Tricks for Tight Kitchens
Apartment fridges and undercounter units force harder choices, but a few adjustments free up real space.
- Move shelf-stable goods (crackers, canned goods, unopened jars) to the pantry. Your fridge should hold only what genuinely needs to be cold.
- Stack vertically with shelf risers or stackable bins to turn one shelf into two usable layers.
- Use portion-sized containers instead of one giant one. It cuts down on multiple half-open packages competing for space.
- Chill only what you’ll use from a multipack, and rethink shopping frequency if your fridge is smaller than your grocery habits assume.
Choosing Fridge Organizers: Glass vs. Plastic and What Else Matters
Before buying anything, measure three things: interior depth, shelf height, and door bin depth. A bin that’s a half inch too deep will block the door from closing.
Material matters more than most shoppers think. Glass containers resist staining and odor better and go straight from fridge to oven, but they’re heavier and can chip. Plastic is lighter, stacks more easily, and shrugs off drops, but it can pick up stains from tomato sauce or turmeric over time and needs replacing sooner.
Whichever you choose, prioritize:
- Leakproof lids, especially for anything with sauce or liquid.
- Dishwasher-safe parts, because hand-washing a dozen bins gets old fast.
- Handles on bins and baskets, so you can pull an entire zone out at once instead of unloading it item by item.
A fridge bin sizing guide covers measurements in more detail, and Kitchen Devotion’s accessory picks round up organizers that have held up well across different fridge sizes.
Why Simple Beats Fancy: A Publisher’s Take
The fridge organization content online tends to oversell complexity: color-coded systems, elaborate zone maps, expensive modular kits. Kitchendevotion’s take, after curating organizer accessories for years, is that the two cheapest habits (labeling and a visible “Eat Me First” bin) do more for food waste than any premium bin set. Clear containers matter because you can see what’s inside, not because they look better on camera.
Try one thing this week: label your leftovers with the date, and put one bin at eye level for food that needs to go first. Then browse Kitchendevotion’s organizer guides when you’re ready to build out the rest of the system.
— K. Connors
Build Your Fridge Organization Kit the Simple Way
You don’t need a dozen products to fix a messy fridge. Kitchendevotion focuses on the handful of items that solve real problems: a set of clear stackable bins, an appliance thermometer that confirms your fridge is actually holding 40 °F, and a lazy Susan for the jars that always get lost in back.
Each piece earns its spot for a specific reason. The bins group leftovers so nothing disappears behind a jar of pickles. The thermometer removes the guesswork some fridge displays get wrong. The lazy Susan turns a dead corner into usable space. None of it requires ripping out your current setup, and none of it is expensive to start.
If you’re furnishing a kitchen from scratch or just upgrading piece by piece, the Kitchen Appliance Priority List for New Homeowners is a good place to see how fridge organizers fit into the bigger picture of setting up a kitchen that actually works for how you cook.
Sources
For deeper reading beyond this guide: the USDA/FSIS refrigeration basics cover temperature rules in full, NC State’s extension guide explains shelf order, and The Kitchn’s chef roundup offers practical organizer tips worth trying.
- Refrigeration & food safety — USDA/FSIS
- Organizing your refrigerator with food safety in mind — NC State extension (McDowell)
- How to organize your fridge, according to pro chefs — The Kitchn
FAQ
What’s the best way to organize a fridge?
Group food by temperature zone: ready-to-eat items on top, dairy and stable perishables in the middle, and raw meat sealed on the bottom shelf, then use clear bins to keep each category visible and easy to grab.
Are fridge organizers worth it?
Yes, especially clear bins and lazy Susans. Visibility is the main factor driving whether food gets eaten before it spoils, and organizers that let you see contents at a glance consistently reduce waste.
What should go on each shelf in the fridge?
Top shelf for leftovers and ready-to-eat food, middle shelves for dairy and eggs, bottom shelf for raw meat and seafood in sealed containers, and the door for condiments and bottled drinks only.
How cold should my fridge actually be?
Keep it at 40 °F or below. An appliance thermometer is the most reliable way to check, since some fridges run coldest near the vents rather than in the back.
What’s the biggest mistake people make organizing their fridge?
Storing milk or eggs in the door, where temperatures swing the most, and skipping labels on leftovers, which is the single biggest reason food gets forgotten and thrown out.



No comment